Support
Get help with Downbeat4-4. Contact us with questions or browse the guide below.
Contact Us
Have a question, found a bug, or need help with your subscription? We’re a small team and reply to every message.
User Guide — Contents
- Getting Started
- Home & Band Dashboard
- Songs
- Chord Charts & Documents
- Setlists
- Shows
- Practices
- Production Companies
- Performance Mode
- Annotations
- MIDI
- AI Song Assistant
- Spotify
- Importing from BandHelper
- Offline & Sync
- What’s Different on Each Platform
- Personal vs. Shared Items
- Plans & Billing
- Account & Teams
- Developer Access (API Keys)
Getting Started
Downbeat4-4 is organized around Projects and Bands. A Project is your workspace (usually one per organization or studio). Each Project contains one or more Bands. Your songs, setlists, shows, and practices all belong to a specific Band.
-
1
Create an account — tap Sign Up on the login screen. You can sign up with email and password, with your Google account, or — on iPhone, iPad and Mac — with Sign in with Apple.
-
2
Create or join a Project — after signing in you'll be prompted to create a new project or enter an invite code to join an existing one. The Join Project screen accepts either a project code or a band invite code; a band code puts you in the project and that band in one step. Projects are your billing unit. One subscription covers your entire Project.
-
3
Create a Band — tap Create Band on the Home screen (admins only). Give it a name and an optional description.
-
4
Invite band members — open the Band's settings page (gear icon, top-right of the band dashboard). If the band has no invite code yet you'll see Generate Invite Code — tap it once, then use the copy button to put the code on your clipboard and send it to your bandmates however you like. The app copies a plain code, not a link — paste it into a text or email yourself. Members enter it on the Join Project screen.
-
5
Add songs and start building setlists — tap Songs on the band dashboard to add your repertoire, then use Setlists to organize songs for upcoming gigs.
Home & Band Dashboard
There are two screens you'll come back to constantly: the Home screen (your account and your list of bands) and each Band's dashboard (that band's day-to-day view).
-
1
The Home screen shows a welcome card, your current Project, and the bands you belong to. Admins see every band in the project; members see only the bands they've been added to. The icons in the top bar are: person (Edit Profile, Subscription, Sign Out), building (Project Settings), and the two-arrow icon (Switch Project).
-
2
The band dashboard is what you get when you tap a band. It shows quick access to Songs, Setlists and MIDI, plus your upcoming shows and upcoming practices (the next five of each). Tap a section header to see the full list.
-
3
Project Settings — the building icon on the Home screen. Here you rename the project, view or copy the project invite code, manage members, set the Performance Defaults (whether new shows start with the metronome and MIDI auto-send switched on), and leave the project. Subscription is not on this screen — it lives under the person icon. See Plans & Billing.
Songs
Songs are the foundation of everything in Downbeat4-4. Each song stores musical metadata, notes, and optional chord chart documents.
-
1
Open the Songs list — tap Songs on the band dashboard or in the side drawer (hamburger menu, top-right).
-
2
Add a song — tap the + button. The new-song form has Title, Artist, Key, Time Signature, Tempo (BPM) and Notes. Duration isn't on the add form — add the song first, then open it and edit it to set Duration m:ss.
-
3
Fill in the tempo — it's optional, but a lot depends on it. The metronome plays a song's stored BPM, so a song with no BPM has nothing to play and the metronome button will appear to arm without producing a click. The AI assistant can look up key, BPM and time signature for you — see the AI Song Assistant section.
-
4
Add performance notes — the Notes field on each song is shown during Performance Mode. Use it for cues, transitions, or any per-song reminders.
-
5
Work on several songs at once — press and hold a song to enter selection mode, then use Select All and the delete button. A single song's overflow menu also offers Copy to Band and Move to Band.
Chord Charts & Documents
Each song has a Documents area with two slots, not a file list: a Default (Band) chart that everyone in the band sees, and My Document — your own version, which takes priority for you when both exist.
-
1
Add a chart — open a song, scroll to Documents, and tap the empty slot you want to fill. You can Upload File (PDF or image) or Create Text Note. Uploads are capped at 10 MB per file. If a scan is rejected as "File too large", re-export it at a lower resolution.
-
2
Suggest a chart as the band default — if you're not a band leader, your upload can be sent up with Suggest as Default. It then shows as Awaiting approval until a leader acts on it.
-
3
Approve suggestions (leaders) — leaders see a Pending Approvals list in the same Documents area, with approve and reject buttons. Until someone approves it, a suggested chart does not become the band default.
-
4
Reading charts — charts open in a built-in viewer in Performance Mode. Pinch to zoom. On the web app they open in the browser's own PDF viewer; no extra sign-in or setup is needed.
Setlists
A setlist is an ordered run of songs, pauses and set breaks for a gig or a rehearsal. The editor is a split panel: your setlist on the left, your song library on the right.
-
1
Create a setlist — tap Setlists on the band dashboard, then the + button. Give it a name.
-
2
Add songs — drag a song from the Song Library panel on the right into the setlist on the left (or tap it to append it). Above the songs are draggable Pause and Set Break chips for the gaps between numbers and between sets. A set break can be renamed — the break editor has a Set Name field, defaulting to "Set 2", "Set 3" and so on.
-
3
Reorder songs — press and hold the drag handle on any row to drag it to a new position.
-
4
Edit a song from the setlist — use the row's overflow menu to open the song editor in a dialog. Note that this edits the song itself, everywhere it appears — a setlist has no per-song overrides of its own. Tapping the row instead launches Performance Mode starting on that song. That's deliberate, but it will take you out of the editor.
-
5
Set the timing defaults — the editor's Setlist Settings sheet holds Gap between songs (sec) and Set break (min), which is how the setlist estimates its own running time.
-
6
Print a paper setlist — tap the printer icon in the setlist editor's top bar to generate a printable PDF for the stage, the sound engineer, or the folder.
Shows
A Show is a booked gig — and it holds a lot more than a date. Alongside venue and setlist it stores the venue address and booking contact, a production company, a six-point day schedule, and the money.
-
1
Create a show — on the band dashboard, tap the Shows section header (or Add Show if you have none yet), then the + button.
-
2
Fill in the basics — date, venue name, status (Confirmed / Tentative / Cancelled), plus address and contact name, phone and email. The Venue Name field autocompletes from venues this band has played before, and the sparkle button beside it asks the AI to look up a venue's address and booking contact for you.
-
3
Build the day schedule — a show has six times, not one: production arrival, band arrival, load-in, sound check, downbeat, and end. Fill in what you know and leave the rest.
-
4
Attach a setlist — link any existing setlist to the show. Tapping the show card on the dashboard will then launch Performance Mode; without a setlist attached, the card opens the show's detail screen instead.
-
5
Track the money — the show detail has a Budget section with a Set Up / Edit button that opens a separate Budget screen. There you record total payment, deposit and whether it was received, itemised expenses (description, amount, category), and how the remainder splits among the band.
Practices
Practices work like shows but for rehearsals: a date, a time, an optional location, and an optional setlist to run through in order.
-
1
Create a practice — on the band dashboard, tap the Practices section header (or Add Practice if the list is empty), then the + button. Set the date, time, and optional location. Practices are not in the side drawer — the dashboard section header is the way in.
-
2
Attach a setlist — link a setlist to run songs in sequence. Tapping the practice card launches Practice Performance Mode.
-
3
If you want the metronome running — it doesn't start by itself unless you've asked it to. Turn on Auto-start under Metronome in Band Settings, and make sure the songs you're rehearsing have a BPM saved. See Performance Mode below for the full conditions.
Production Companies
If you work through agencies, promoters or production companies, you can store them once and attach them to shows instead of retyping the contact every time. Production companies belong to the Project, so every band in the project shares the same list.
-
1
Manage the list — from a show's Production Company field, tap through to the production companies screen to add, edit or delete entries.
-
2
Attach one to a show — pick it in the Production Company field on the show form, and add Production Notes if there's anything specific for that gig.
Performance Mode
Performance Mode gives you a full-screen view built for the stage: large song info, chord charts, metronome, MIDI, annotations and Spotify playback — all in one toolbar.
-
1
Launch — tap a show or practice card on the band dashboard (the card must have a setlist attached), or tap a setlist tile on the Setlists screen. You land first on a list of the setlist's items; tap an item to open the full-screen player on that song.
-
2
Move between songs — use the forward/back arrows, or swipe. On a single-page chart a swipe changes song. On a multi-page chart, a swipe turns the page first and only moves to the next or previous song once you swipe past the last or first page. If you're mid-chart and want the next song now, use the arrows — they always change song.
-
3
View chord charts — if a song has a document attached, it opens automatically. Pinch to zoom.
-
4
Metronome — the metronome button in the toolbar switches the click on and off. It plays the current song's stored BPM. A song with no BPM saved has nothing to play — the button will look armed and stay silent. Set a tempo on the song to fix it.
-
5
Metronome auto-start (optional) — off unless you switch it on. Turn on Auto-start under Metronome in Band Settings and it will start when you enter Performance Mode. It needs three things to be true: the switch is on for that band, the song has a BPM, and your device is online. Band metronome settings are read live from the server, so with no connection the auto-start simply doesn't happen. If it matters for a no-signal venue, plan to start the click by hand.
-
6
MIDI auto-send — when a MIDI device is connected and the song has a preset assigned, Downbeat4-4 sends that preset as you arrive on the song. See the MIDI section for the conditions — in particular, presets saved as Send when: Button press deliberately do not fire on navigation. Mobile only (iPhone, iPad and Android). Requires a Bluetooth or USB MIDI interface.
-
7
Spotify playback — if you've connected a Spotify account and the song is matched to a track, a green play button appears in the toolbar. See the Spotify section.
Annotations
You can mark up a chord chart directly in Performance Mode — circle the key change, highlight the tag, write yourself a cue. Annotations are saved per page and come back the next time you open that chart.
-
1
Turn annotating on — tap the annotate button in the Performance Mode toolbar. The annotation toolbar appears over the chart.
-
2
Pick a tool — Pencil, Highlighter, Text or Eraser. Text supports a font size, bold and italic; each tool has its own colour.
-
3
Fix mistakes — Undo steps back one mark; Clear all wipes the page. The eraser removes individual marks.
-
4
Get back to performing — tap Exit annotate in the annotation toolbar. While annotating, your touches draw instead of turning pages.
MIDI
MIDI presets send program changes and control changes to hardware instruments, effects pedals and synths — automatically as each song comes up in Performance Mode. Available on iPhone, iPad and Android. Not available in the web app.
-
1
Connect a MIDI interface — plug in a USB MIDI interface (with the appropriate adapter) or pair a Bluetooth MIDI adapter. The app scans and connects on its own; there's no manual setup step and no need to launch things in a particular order. To see device status or rescan, long-press the MIDI button in Performance Mode — that opens the MIDI devices sheet. (Tap sends MIDI; long-press opens devices.) That sheet also holds the Adapters list, where you name each physical adapter — see Telling identical adapters apart below.
-
2
Define your instruments — open MIDI Presets from the band dashboard or drawer. The screen is titled MIDI and has four lists: My Devices, Shared Devices, My Presets, Shared Presets. Tap Add next to My Devices and give each physical instrument a name and MIDI channel.
-
3
Create a preset — tap +, name it, and add per-device program changes (patch number), optional bank select (MSB / LSB), control changes (e.g. reverb level, volume) and, if you need it, raw MIDI in hex.
-
4
Choose when it fires — each preset has a Send when setting: Song loads (sent automatically as you arrive on the song) or Button press (sent only when you tap the MIDI button on stage). A preset set to Button press will never fire on its own, which is the usual explanation for "my preset didn't send".
-
5
Assign to a song — open the song's detail screen and pick the preset in its MIDI section. Assignment lives on the song, not on the setlist.
-
6
Share it if the band needs it — devices and presets have a Share with band switch. An unshared preset resolves only for you: if you assign it to a band song, nobody else's device will send anything on that song, and they'll see no error explaining why. Share anything the band relies on.
Telling identical adapters apart
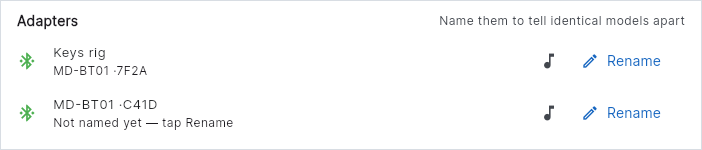
A Bluetooth MIDI adapter broadcasts a fixed model name that cannot be changed on the hardware. Two adapters of the same model — two Yamaha MD-BT01s, say — therefore both report themselves as MD-BT01, and a third on a bandmate's pedalboard looks identical again. Downbeat4-4 solves this by letting you nickname each adapter, and by showing a short unique ID until you do.
-
1
Power on every adapter you want to name and let the app connect to them. The Adapters list only shows adapters that are currently connected.
-
2
Open the Adapters list — in Performance Mode, long-press the MIDI button to open the MIDI devices sheet and scroll to Adapters. Outside Performance Mode, go to MIDI Presets from the band dashboard and tap the debug icon in the top bar. Every connected adapter gets its own row. Before you name them, each row reads model plus a short ID — for example MD-BT01 ·7F2A and MD-BT01 ·C41D — so two of the same model are already distinguishable.
-
3
Work out which row is which — tap the ♪ button on a row. The test note goes to that adapter only, so whichever keyboard, module or pedalboard responds is the one that row refers to. If you would rather not guess at all, power up one adapter at a time and name each as it appears.
-
4
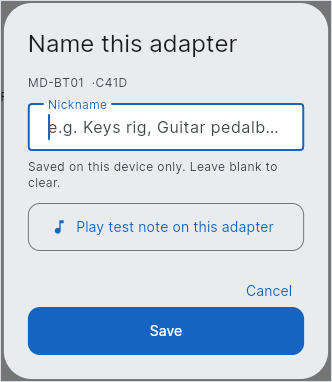
Tap Rename and give it a name — something that describes the rig it is plugged into, such as Keys rig or Guitar pedalboard. The dialog has its own test-note button so you can confirm before saving. Leave the field blank and save to clear a nickname.
-
5
Use the nickname when assigning presets — on a MIDI device in the MIDI screen, the BLE Adapter dropdown now lists your nicknames instead of a row of identical model names, so you can point each instrument at the right physical adapter.
AI Song Assistant
The AI assistant looks up song metadata — key, BPM, time signature, duration — and hands it to you as an editable card you can save into your library. Powered by Google Gemini.
-
1
Open the assistant — the sparkle button on the Songs screen (it's also offered in the empty state when a band has no songs yet).
-
2
Ask about a song — type something like "What key is Superstition by Stevie Wonder?" or "Find me the BPM and time signature for Sweet Home Chicago."
-
3
Confirm the suggestion — the assistant presents an editable card with the data it found. Review and adjust any fields, then tap Add Song to save it into the band's library.
Spotify
Connect a Spotify account and you can pull up the recording of a song while you're rehearsing — straight from the Performance Mode toolbar. In-app playback control requires Spotify Premium.
-
1
Connect your account — open Settings (person icon → Edit Profile) and tap Connect on the Spotify card. You'll sign in with Spotify and come back to the app. The card then reads Connected; tap Disconnect to unlink at any time. The connection is per person, not per band. Each member connects their own account.
-
2
Play a song — in Performance Mode, matched songs get a green play/pause button in the toolbar. With Premium, this controls playback on your active Spotify device (your phone, a desktop, a speaker).
-
3
On a free Spotify account — Downbeat4-4 can't drive playback, so it opens the track in the Spotify app instead. That's expected behaviour, not a fault.
Importing from BandHelper
Moving from BandHelper? You can bring a whole repertoire across in one pass, including MIDI presets and chart documents.
-
1
Export from BandHelper — in BandHelper, go to the Songs page and tap Export. You'll get a tab-delimited text file. Optionally export your MIDI presets the same way, and your documents as a ZIP archive.
-
2
Start the import — in Downbeat4-4, open the band's Songs screen, tap the overflow menu (⋮) and choose Import from BandHelper.
-
3
Pick your files — the songs export is required; the MIDI presets export and the documents ZIP are optional. The wizard tells you how many songs, presets and files it found in each.
-
4
Preview and select — tap Next: Preview & Select. You get a list of everything found, with matched documents flagged, and you choose which songs to bring over before confirming the import.
Offline & Sync
On iPhone, iPad and Android, Downbeat4-4 keeps your data on the device and syncs it when you're online — so a venue with no signal doesn't cost you your setlist. The web app has no offline mode; it reads and writes live and needs a connection.
-
1
Nothing to download — songs, setlists, shows, practices and MIDI presets are stored locally as you use the app, and chord charts are cached automatically in the background. There is no "make available offline" button to remember to press.
-
2
Check before you go — the band dashboard shows an offline readiness chip: "N/M charts saved offline", green when everything is down, amber while it's still working, red if something failed. Tap it for the list of what's missing and a Retry button. Do this on wi-fi, not in the load-in door.
-
3
Edits made offline are kept — changes you make with no connection are queued on the device and pushed up automatically the next time you're online.
-
4
Two things still need a connection, even on mobile — band metronome settings (including the Auto-start switch) and production companies are read live from the server. Offline, metronome auto-start won't happen and the production-company list will be empty. Everything else in this list works without signal.
What’s Different on Each Platform
Downbeat4-4 runs on iPhone and iPad, on Android, and in a web browser. Most of the app is identical everywhere. These are the differences worth knowing about.
MIDI
Mobile only — iPhone, iPad and Android. The web app has no MIDI support at all.
Offline use
Mobile only — iPhone, iPad and Android store data and charts on the device. The web app needs a connection.
Billing
On iPhone, iPad and Mac, subscriptions are purchased and cancelled through Apple. On Android and on the web, they go through Stripe.
Chart viewing
Mobile uses a built-in viewer; the web app opens charts in your browser's PDF viewer. Either way there's nothing extra to install or sign into.
Personal vs. Shared Items
A few things in Downbeat4-4 belong to you rather than to the band. It's worth five minutes to understand which, because it explains two situations that otherwise look like bugs.
Personal to you
Your My Document chart on a song · unshared MIDI devices and presets (My Devices / My Presets) · your annotations · your Spotify connection.
Shared with the band
Songs, setlists, shows, practices, the band Default chart, and any device or preset with Share with band switched on.
-
1
“My bandmate can't see the chart I uploaded.” — you filled the My Document slot. Fill the Default (Band) slot instead, or use Suggest as Default and have a leader approve it.
-
2
“My MIDI preset doesn't fire on anyone else's device.” — the preset isn't shared. An unshared preset assigned to a band song resolves only for the person who created it; everyone else gets silence and no error. Turn on Share with band in the preset (and in any device it uses).
Plans & Billing
Downbeat4-4 has a free tier and four paid plans. A subscription belongs to the Project and covers everyone in it. What the plans change is how many members, songs and setlists the project can hold — there is no limit on the number of bands on any plan.
Free
1 member, 5 songs, 1 setlist. Enough to try the app out.
Band
Up to 5 members. Unlimited songs and setlists.
Band+
Up to 10 members. Unlimited songs and setlists.
Pro
Up to 15 members. Unlimited songs and setlists.
Business
Up to 35 members. Unlimited songs and setlists — for agencies and studios running several acts.
-
1
Find the Subscription screen — tap the person icon in the top-right of the Home screen and choose Subscription. It's also reachable from Settings → Upgrade Plan / Manage Subscription. It is not under the building (Project Settings) icon.
-
2
Subscribe on iPhone, iPad or Mac — purchases go through Apple's in-app purchase. To change or cancel later, open Settings → Apple ID → Subscriptions on your device; refunds are requested from Apple at reportaproblem.apple.com.
-
3
Subscribe on Android or on the web — checkout runs through Stripe. Afterwards, Manage Subscription on the Subscription screen opens the Stripe customer portal, where you can update payment methods, view invoices, or cancel. Android bills through Stripe, the same as the web — not through Google Play.
-
4
If you outgrow your plan — move up a tier for more seats, or email us. We'll sort out anything the app can't.
Account & Teams
Downbeat4-4 uses a role-based system. Every user belongs to a Project with either an Admin or Member role.
Admin
Can create and delete bands, invite members, manage the subscription, and see every band in the project.
Member
Can view and edit data in the bands they've been added to, and sees only those bands. Cannot create bands.
-
1
Invite members — open Band Settings (gear icon), generate the band's invite code if it doesn't have one yet, and copy it. Send the code to your bandmates; they sign up and enter it on the Join Project screen. A project-level invite code also lives in Project Settings.
-
2
Edit your profile — tap the person icon in the top-right and choose Edit Profile. The screen is titled Settings; it's where you update your display name, connect Spotify, and reach your subscription.
-
3
Leave a project — Project Settings has a Leave Project action if you're moving on but don't want to close your account.
-
4
Delete your account — in Settings (person icon → Edit Profile), scroll to the bottom, tap Delete Account and confirm. Deletion is immediate and cannot be undone.
-
5
Sign out — tap the person icon → Sign Out.
Developer Access (API Keys)
If your band has its own website, you can let it read your song list directly out of Downbeat4-4 with an API key. This is optional and most bands will never need it.
-
1
Open the API Keys screen — Band Settings → Public API → API Keys. Band leaders only.
-
2
Create a key — tap Create API Key and give it a label so you remember what's using it. The key is shown exactly once, at creation. Copy it and store it somewhere safe — the app cannot show it to you again. If you lose it, revoke it and create a new one.
-
3
Use it — call
GET /api/v1/songswith the headerAuthorization: Bearer <your key>. It returns that band's songs. -
4
Keep songs out of it — each song's edit screen has a Show in public API switch. Turn it off for anything you don't want on your website; songs are included by default.
-
5
Revoke a key — the API Keys screen lists your keys; use the revoke action on any key you no longer trust or need. Anything still using that key stops working immediately.